Five Minutes for Makeup, Part 2

This is the second in my three-part series on my experiences with skincare and makeup.

I’ve been on a mission of late to maintain to most radiant skin possible. In my previous post, I talked about getting rid of old and unusable products.
After I tackled my Caboodle full of expired skincare and makeup, I focused on how my makeup brushes affect the health of my skin. I’m sure there is a scientific explanation about how it works, but I’m going with logic. Using a brush over and over without cleaning it means at some point, you are putting dirt on your face and back into your products. This sounds gross, and I doubt that it’s good for your complexion.
A Sephorian once suggested I use sponges to apply makeup. I wouldn’t have to worry about contaminating products or keeping tools clean. I tried it and hated it. My makeup was splotchy, and I kept forgetting to buy new sponges after I ran out. So I stick with brushes. They give me the application I like with minimal effort. To keep the makeup cooties at bay, I spend five minutes each week cleaning them. There are two techniques that I’ve tried.

Baby Shampoo or Liquid Hand Soap. Wet the brush and work a little soap into the it. Rinse until the water’s clear. Be careful not to let the metal clamp that connects the brush to the handle get too wet. Over time, excess moisture could weaken the glue that keeps the bristles in place. During one of my numerous trips to somebody’s cosmetics counter, a consultant told me to let the brushes dry while lying on their sides. If possible, the bristles should hang over an edge. Never put your brushes upside down in a cup; they will get mangled. Lying your brushes on a towel to dry could bring on mildew (yuck!).

Dishwashing Liquid + Vinegar. I found this link thanks to Pinterest. Mix one tablespoon of dish detergent and one tablespoon of vinegar with a cup of warm water. Swish the brushes around, again taking care to avoid the metal clamp. Rinse until clear and dry as indicated above. I thought my brushes were clean until I tried this method. The water turned brown as soon as the tip of the brush hit the water.

I’ve seen a HUGE difference since I started regularly cleaning my brushes. My makeup applies much better, and I tend to use less product. Between this and using unexpired products, I’ve had fewer breakouts.

Stay tuned for Part 3 – My five-minute face!

– Posted using BlogPress from my iPad

Five Minutes for Makeup, Part 1

The older I get, the more makeup it takes for me look as if I’m not wearing all that much makeup.

I spent my teens in nothing but lip gloss. A brief summer job at a department store cosmetics counter won me a slew of eyeshadow, most of which I gave away or let expire. I breezed through my 20s with gloss, groomed eyebrows and the occassional application of undereye concealer or powder.

Then 30 happened. That year, I had my first child, and fluctuating hormones, sleepless nights, and sketchy eating habits made my skin go beserk. The makeup routine of my youth no longer cut it.

Fortunately, my time at the cosmetics counter put me on a good skincare rountine. I wash, tone and moisturize twice a day. Unfortunately, that same experience made me a skincare junkie. I’m willing to try just about anything, and the words “gift with purchase” are very difficult for me to ignore. Once I decided to jump on the makeup bandwagon, the addiction took hold. Emails from Sephora inevitably ended in an online order.

The binge resulted in an overwhelming collection of products. I figured out how to put on my makeup in about five minutes (explanation to come in Part 3), and I was generally pleased.

Yet, I was not that happy with my natural complexion. I experienced occasional breakouts, and the zits left dark spots that took months to fade.

I opened my medicine cabinet one day and looked at my skincare and makeup. I was unsure of when some of them were purchased. That’s when the epiphany hit:

Was I making my skin worse by using too many products and/or expired products? The miracle of modern technology known as Google led me to a few articles that confirmed my suspicions. Makeup can grow bacteria if it’s kept too long. I’ve never known the “b” word to be associated with anything good, so I went about the business of cleaning out my cosmetics.

I pulled out my Caboodle and stash of cosmetics bags. I’m a child of the 80s, so yes, I still have a Caboodle. It’s blue with a purple clasp and pull-out tray; I convinced my mom to buy it for me because it was on clearance at Target.

But, I digress. Here’s how I spent five minutes:

Samples and unflattering free gifts were the first to go. I have sensitive combination skin, so anything uncomplementary to that hit the trash. BB cream and foundations labeled “oyster bisque” were next out the door. My profile pic should tell you why those don’t work. I also tossed samples of high-priced products. There’s no need to fall in love with anything I can’t afford to buy when the sample runs out.

Then I tackled my products in rotation and got rid of anything that expired. I’ve heard so many things about how long you should keep makeup, so this was tricky.  In general, mascara is a three-month deal. I value my eyesight, so I adhere to this one. Most foundations last about a year, some powders can go for two. Eye and lip liners, when sharpened from time to time, can last about three years. If you’re like me, and you don’t remember when you bought it, it’s probably a good idea to throw it out. And if it smells funny, that’s a definite toss.

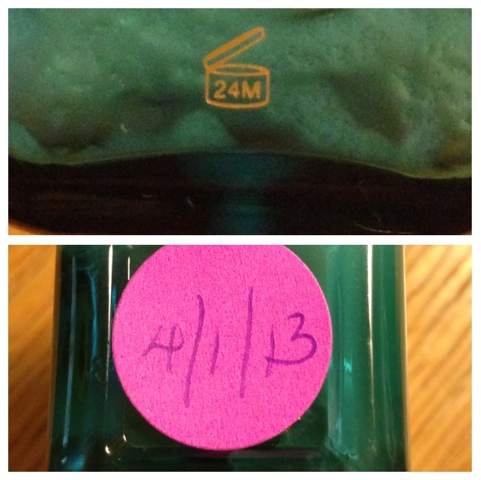
During one of my many trips to Sephora, a makeup artist told me to pay attention to product labels. Some manufacturers indicate how long to keep a product with this tiny diagram:


If you have extra time, you can use those little round stickers to label products. I write down the date that I open it so that I know how long it takes me to use something completely. And I know exactly when to toss it if there’s any left when that window expires.

So, how’s my skin doing? I’ll give you an update in Part 2!

– Posted using BlogPress from my iPad

Today’s Selfie: Stripes!

Monday’s post on my personal style has me more aware of my outfits this week. Fortunately the awareness has been good, because I like who I see. Fortunately or unfortunately, depending on your point of view, it also has made we want to take more selfies.
I am in a constant love affair with black/white patterned shirts. That love becomes near close to obsession if the pattern is a stripe. Horizontal stripes used to be a no-no for me, but the more flattering cut of t-shirts these days make them work. I’m also trying pattern mixing, which I find that I like very much. 

Fabulous Me: My Personal Style

Lil Ma’s daycare teacher, Miss M, recently commented on an outfit I was wearing.

“That’s really cute,” she said. “I love the way you dress.”

I smiled and thanked her for the compliment. Miss M is in her early 20s. During the past six months, she’s had at least five hair styles and a variety of outfits.  I’m easily a decade older, and I remember going through a similar phase. Back then, getting dressed felt like an Olympic event. I’m happy, I thought, to be done with that.

That’s when I realized something. At long last, I love the way I dress too.

It’s taken me 30-something years, two kids and a slew of fashion faux pas to find a style that works for me. The bulk of the journey was spent adjusting my frame of mind. Here are the lessons I learned.

Know (and love) your body. I’ve got a small rack, a narrow waist and a backside that is one-two sizes bigger than everything else. I wasted years in college longing for a narrower hips, and from time to time, I pull out a Barely-B bra and wish it were a C. Most days, though, I get a peek of myself as I’m stepping out of the shower, and I think I look just fine.

Work the positive. Accepting my curves allowed me to focus on finding clothes that flatter. Bright color, sparkle (cool jewelry), and structure are my best friends.

Admire and adapt. Steering clear of trends entirely can result in a fashion rut. Pinterest, blogs and people watching help me keep my wardrobe up to date, but I have to be selective to make sure new pieces work with what’s in my closet. It gets easier over time.

Know your limits. There are some things that just will not work in my case. If overalls or parachute pants ever make a comeback, I guarantee you that I will not be wearing them.

I spent a lot of time thinking about the word I would use to describe my style. I went through all of the fashion buzzwords. Classic, chic, et cetera. None of these seemed right. My style is simply me, and I’m good with that.