#TBT – My Vintage Jacket

IMG_0330

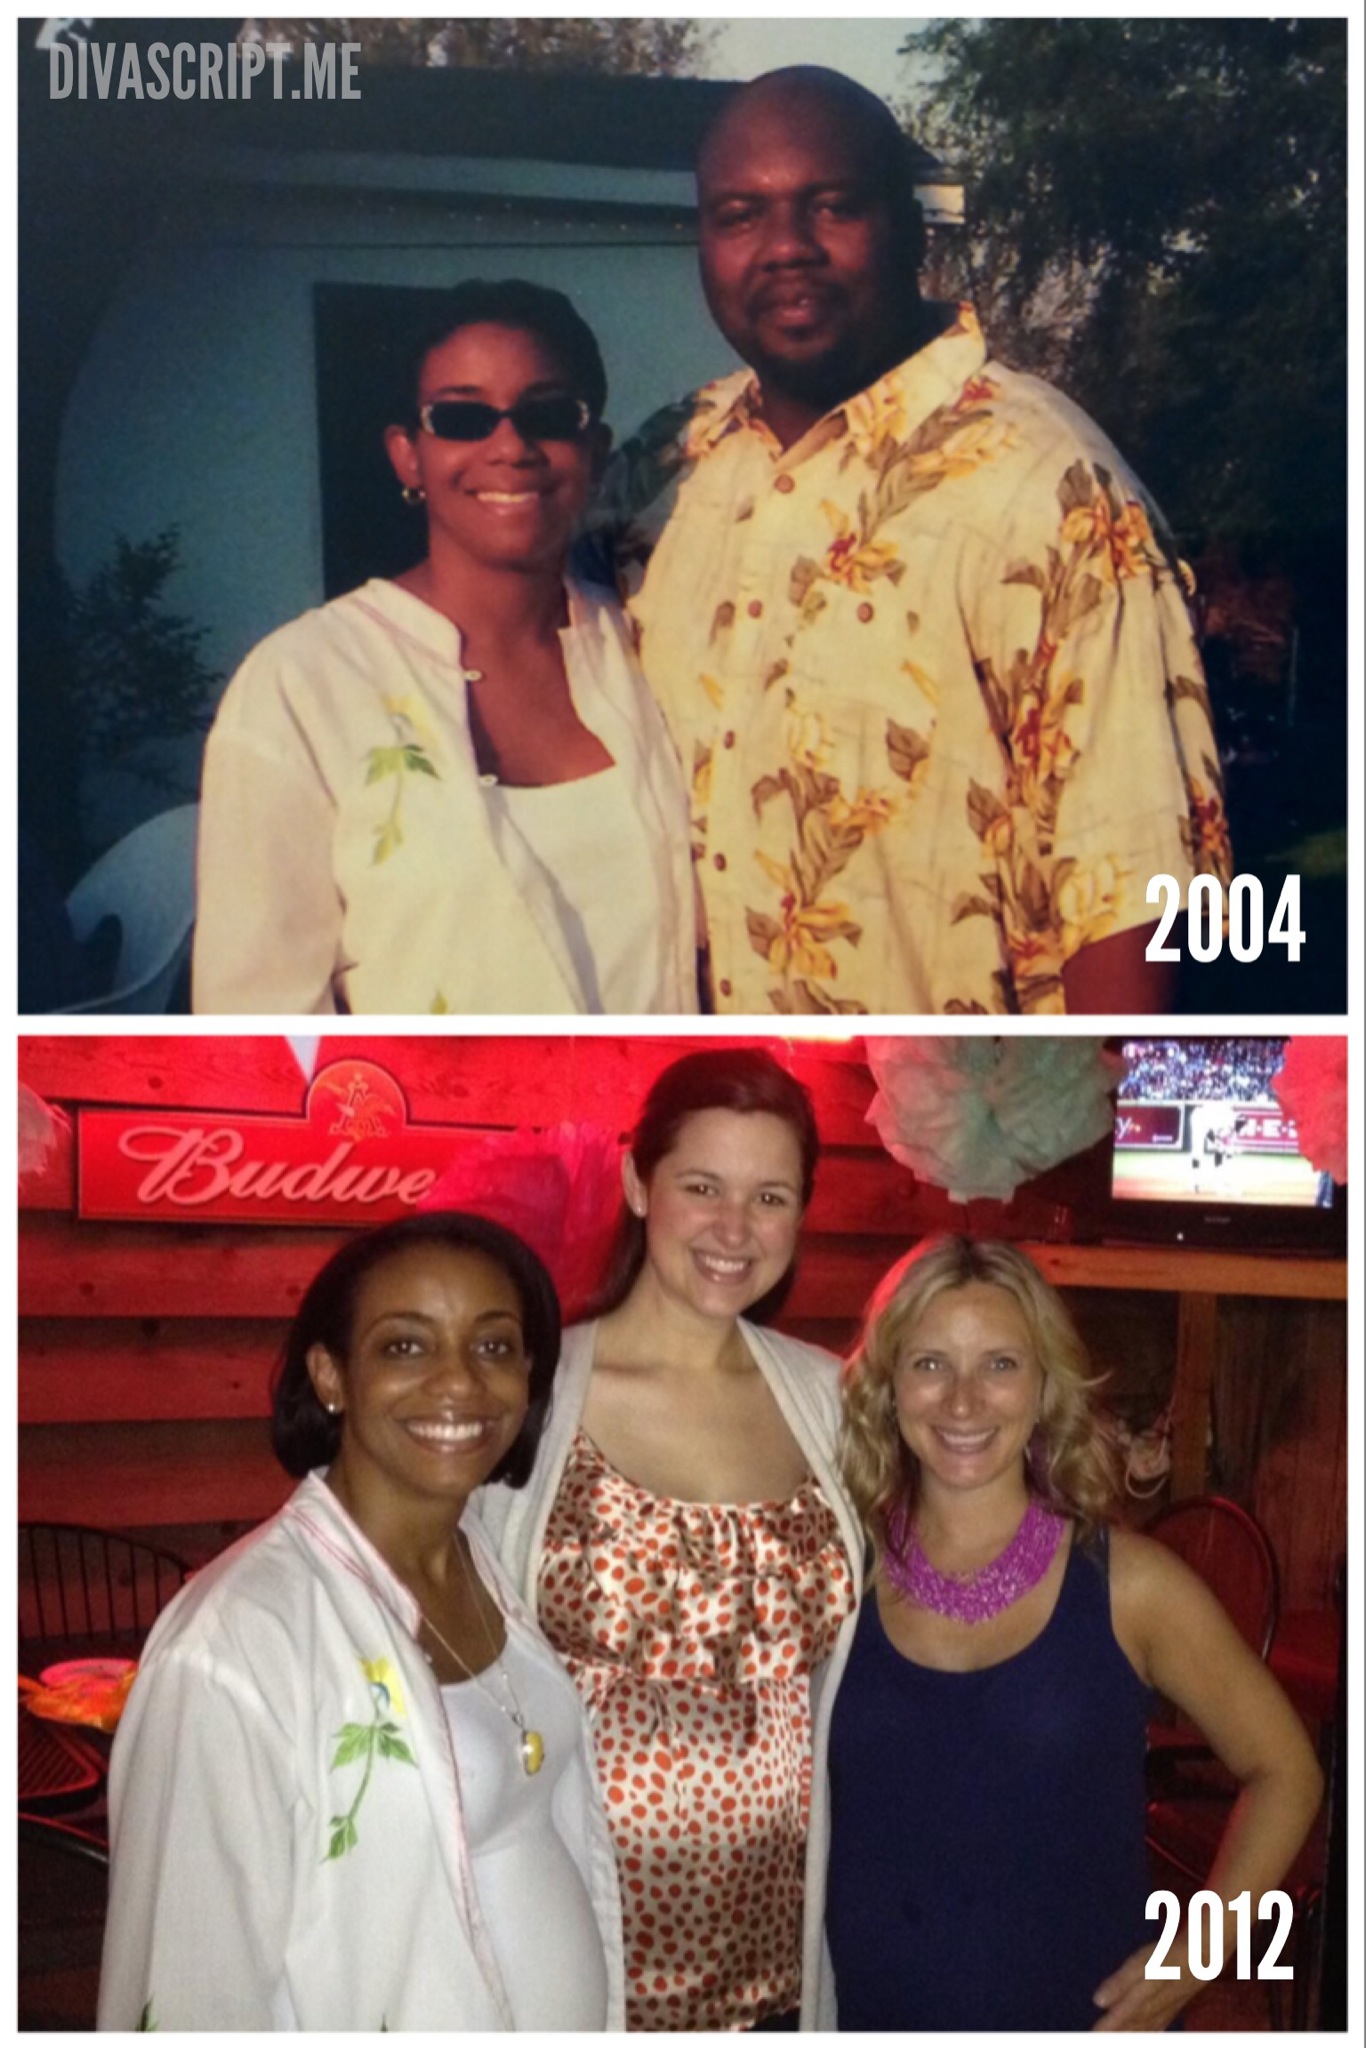
On Today this morning, the theme of a short Throwback Thursday segment was repeat outfits. The topic was inspired by a recent article about German Chancellor Angela Merkel, who’s been wearing the same tunic since 1996. For the average person, repeating outfits is not a big deal. I, for one, do not have an unlimited budget for an expansive wardrobe. But, I do ok. If I used every item in my closet, I could go for a good stretch without wearing the same thing from head to toe twice. (Does anyone else remember those fashion articles where they took 10 pieces and made a month’s worth of outfits? I will have to try that.) Eighteen years, though, is a long time. Initially, I couldn’t think of any item of clothing I’ve had for nearly that long. Jewelry? Bags? That’s another matter entirely. Clothing, I thought, just doesn’t last like it used to. Plus, I’m a little fickle, and I purge at the several times a year. Then I remembered this Caro of Honolulu jacket I bought at a church yard sale. I don’t remember the year I bought it, but I do remember I still lived with my parents. That was at least 15 years ago.

IMG_0342-0

The jacket was dingy and reeked of old perfume. But it was only $1, so I gave it a chance. An overnight soak in salt water proved my dollar investment worthwhile. Every now and then, I have to touch up a small section of embroidery, but this baby has stood the test of time. I LOVE this jacket. I wear it every spring and summer. It looks great with jeans or layered over a sundress. It’s apparently also a great maternity piece, because I could only find pictures of myself wearing it while I was pregnant. I know I had it on last week.

What item of clothing has stayed with you through the years?

Follow on Bloglovin

Relaxed to Natural: Curl Today, Straight Tomorrow

20140728-000338-218035.jpg

If you’ve been following along, then you already know I’m in the midst of growing out my relaxer. So far, the journey has been a mixed bag. Some days, I’m extremely happy with the way my hair looks. On others, I wish I could wear a hat to the office.

Speaking of the office, it appears my evolving hairstyle has attracted the interest and occasional confusion of my coworkers. The first day I wore a twist-out, I was showered with question-laced compliments. Colleagues wanted to know if the curls were my natural texture, and upon learning the answer, they then inquired about how I created the curls.

“You’re hair looks great,” a woman said. “Did you get a perm?”

“Um, do people still get those?” I asked.

I went to a nearby whiteboard and drew a squiggly line with a straight end. I explained my hair was in the process of returning to full squiggle. Until I cut off all my relaxed hair, I wouldn’t know its true texture. I told her we’d find out together. She nodded, but I think she was still confused.

The following week, my hairstylist flat-ironed my locks.

“What happened to your fancy new hairdo?” someone asked me as I stepped onto the elevator.

“Check with me in two weeks.” I replied.

My curl-today-straight-tomorrow phase has attracted more attention than I expected, but I’m glad I’m doing it. Trying new styles and techniques has made this experience fun.

I have a hair appointment on Thursday, and we’re doing something totally new. Friday will be very interesting.

Follow on Bloglovin

Wedding Day Emergency Kit

Not too long before my wedding, a coworker handed me a large cosmetic bag. It was filled with things a bride might need in a pinch, like hair pins and stain remover. It even had crayons and an miniature activity book for my daughter.

I honestly can’t remember everything she gave me, but the gift went a long way in helping me feel at ease on my big day. There are a million things that could go awry during a wedding, but with my emergency kit, I was prepared for a lot of them. Plus, the cosmetic bag itself was awesome. I still use it for travel. It was by far the one of the most thoughtful wedding gifts I received.

Since that time, I’d taken the idea and tweaked it for birthdays and baby showers. But I had yet to return to the original concept.

I took the opportunity to do so for a coworker who is getting married soon. Because I blanked on what was in my kit from five years ago, I did a little digging online for suggestions on what to include. It turns out you can purchase pre-made kits for anywhere from $16 – $100. I wasn’t really impressed, so I stuck with the decision make my own.

Before I go through my list, here are few things to keep in mind.

Make a list first. This will keep you from going overboard in the travel aisle.

Check your personal stash. Even with a list, a visit to the travel aisle can get pricey. So it’s good to start by seeing what you already have. You probably don’t need to put 100 bobby pins in the kit. Ten or so will do. Also take a look at any miniature freebies you may have collected from travels. Those little vanity or dental kits are perfect for this type of thing. Samples and cosmetic bags from beauty gifts with purchase are great too.

Keep an eye out for sales. This past winter, I raided clearance sections for deeply discounted stocking stuffers, like manicure sets and mini nail polishes. (Those mani kits were 25 cents each!)

Get creative with packaging. I have countless little envelopes and baggies from spare buttons. Those are just the right size for hair pins or earring backs. You can also attach bobby and safety pins to a strip of ribbon.

A fancy cosmetic bag is cool, but not necessary. An organza gift bag or even a plastic zip-top one work just as well.

Here’s what I assembled for the bride-to-be:

General Healthcare
Tissue
Pain reliever
Bandages
Breath mints
Dental floss
Cotton pads
Cotton swabs

Clothing Repair
Sewing kit
Safety pins
Stain remover
Lint roller
Wrinkle release
Fashion tape (I found this after I gave her the kit…BUMMER!)

Hand and Nail Care
Hand cream
Nail clippers
Emory board
Clear polish
Polish remover wipes

Hair
Hair pins
Bobby pins
Hair spray (I forgot this too.)

Misc
Earring backs

If you decide to make one of these, I’d love to hear how you customized it!

20140716-233341-84821881.jpg

Follow on Bloglovin

Relaxed to Natural: The Journey So Far

20140625-000151-111377.jpg

I’m on my way into the seventh month of my hair transition, and so far, it hasn’t been that bad. If someone had told me a year ago that I’d grow out my relaxer, I would have laughed and plastered my car with “creamy crack ain’t wack” bumper stickers.

I’ve tried to approach this journey with an open mind, but there are a few things I wish I had known when I started.

It’s NOT cheaper. At least not yet. A friend gave an enthusiastic endorsement for natural hair, saying it would be budget-friendly.

“You won’t have to pay for relaxers, so you’ll save money.”

There are two things she didn’t count on. One, my stylist charges more for natural hair. Two, my unrelaxed roots don’t take well to temporary color treatments, so I had to upgrade. Add in the cash I’ve spent to build a moderate stash of at-home haircare products, and money is flying out of my wallet like it has wings.

Two textures means two solutions. My first attempt at a twist-out resulted in thick waves at the scalp with stringy ends because I over applied styling product. My relaxed locks couldn’t absorb it all. Now that my hair is a mix of textures, it takes multiple products or techniques to get a consistent look.

There’s no such thing as too much conditioner. Or, if there is, I haven’t reached the limit yet. My natural hair needs every bit of my heavy-handed application.

There is a such thing as too many YouTube videos. There are thousands of product reviews and demonstrations online. Some contain valuable information while others don’t. It’s easy to get overwhelmed.

Whatever my friend(s) did, it probably won’t work for me. Hair texture, personal preferences, and individual efforts factor into the final style. If something doesn’t work, it’s no big deal. There are plenty of options.

What doesn’t work now may work later. As my natural-to-relaxed ratio increases, I’ll revisit some things that didn’t work so well the first go round.

The pic above isn’t my fav, but it shows one of my more successful efforts at a flat twist-out. I’ll keep you posted as the journey continues.

The Mommy Uniform

The transformation takes place for some of us before we are even aware of it. During the first months of parenting, we are covered in spit up, milk, and baby poo. We fall into a world that revolves around our infants, and when we emerge ready to reconnect with the rest of society, it’s too late. We’ve given up our good clothes for a mommy uniform.

With Mini Me, I wore jogging pants and family reunion T-shirts. It was warmer when I had Lil Ma, so I wore shorts instead. A closet full of more flattering gear collected dust.

I know. We need to get back down to our fighting weight for some of those clothes to fit. We aren’t going anywhere but to the grocery store, so who cares? The baby spits up on everything, so why does it matter?

It matters because you matter.

Being a mom is work. Hard work. You get overwhelmed in a flash. You can feel as if you are slipping away. And before you know it, you’re at the bottom of your own priority list, if you’re even on the list at all. You may not be able to do everything you did before having kids, but maintaining your personal style is one way you can put yourself first.

Don’t get me wrong. My wardrobe has undergone some changes since I became a mom. I iron a lot less. Machine washable fabrics are my friends. But there’s plenty I can wear that doesn’t involve my family’s name and an outline of the United States. Right now, I’m into mid- and maxi-length sundresses. Super easy and super cute. Below is a pic of one of my favorite combos — a chevron maxi with denim jacket.

20140504-212632.jpg

What’s your go-to fashion staple?

Follow on Bloglovin